A little bit blown away that my Blue Notes project was Netmag’s ‘Side project of the month’ last November, I thought I’d put a post together detailing some of the updates I’ve been making recently, especially with regard to CSS Grid.
Whilst this is primarily about layout and how, with the help of Grid, I arrived at hack-free solutions for occasionally complex designs, I also mention how I used psuedo-selectors, CSS filters and blend-modes to create aged and worn effects a little later in the post too. If you’d like to know more about how I made type responsive or perhaps better put, fluid, you can read about the methods I used to do this in my original post and in a recent post on creating fluid distressed text in CSS.
TL;DR
Having re-created the first batch of sleeves I’ve begun to focus on intrinsic layout and semantics. Essentially I’ve been re-visiting sleeves I’d made previously and removing what I saw as structural compromises.
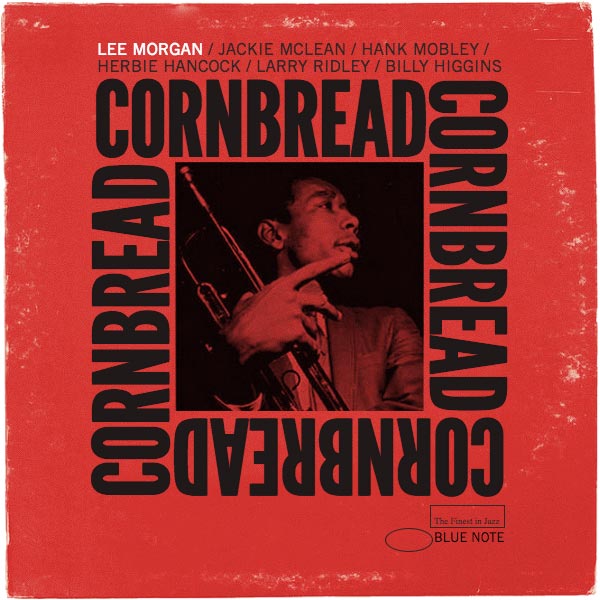
By way of example Cornbread was one of the most challenging and exciting sleeves to build, the sleeve below being built entirely in CSS Grid, featuring semantic, accessible mark-up with no hacks. I’ve made a quick screencast to demo the sleeve re-sizing in the browser and there’s a repo with the code for this and all the other sleeves I’ve made here. This and some of the other sleeves are on CodePen too. I’ll be posting the mark-up and a deep dive into how I built Cornbread soon.
A project review
Overall I was pretty happy with the first batch of sleeves I made.
By the time I’d finished the first twelve or so sleeves (aka phase one..) I’d developed a solid process, was able to match the originals almost identically and make layout and typography responsive. It was great to be able to re-create Reid Miles work in the browser and to produce some radically different layouts to those we see everyday too. That said there were some elements of production that I was less satisfied with.
Aside from problems sourcing fonts, three things irked me about the build of some of the sleeves, all of which were pretty much structural;
Marking up content hierarchically and then having to re-order this visually meant I often had to use absolute positioning. Whilst I was able to address this problem using Flexbox and the order property initially, this wasn’t without it’s pitfalls.
In addition I was unhappy that many of the layouts used background images. Whilst I would be ok with this if they were used to apply texture or a similar effects, from an accessibility perspective it seemed wrong to have such integral parts of the design removed from the HTML.
Finally and somewhat related to my second point, all the sleeves relied on the padding-bottom hack to ensure they maintained their shape at different viewport widths. Whilst not the end of the world this was something I would prefer not have incorporated.
Incorporating CSS Grid
Grid was a bit of a game changer. Easy to use, I could eliminate all the shortcomings outlined above.
The more I experimented with Grid the more I appreciated the creative freedom and sense of legitimacy that came with it. I could layout great designs without feeling those slight pinpricks of shame that came from knowing I’d used a hack, trick or absolute positioning or that I might have inadvertently compromised accessibility.
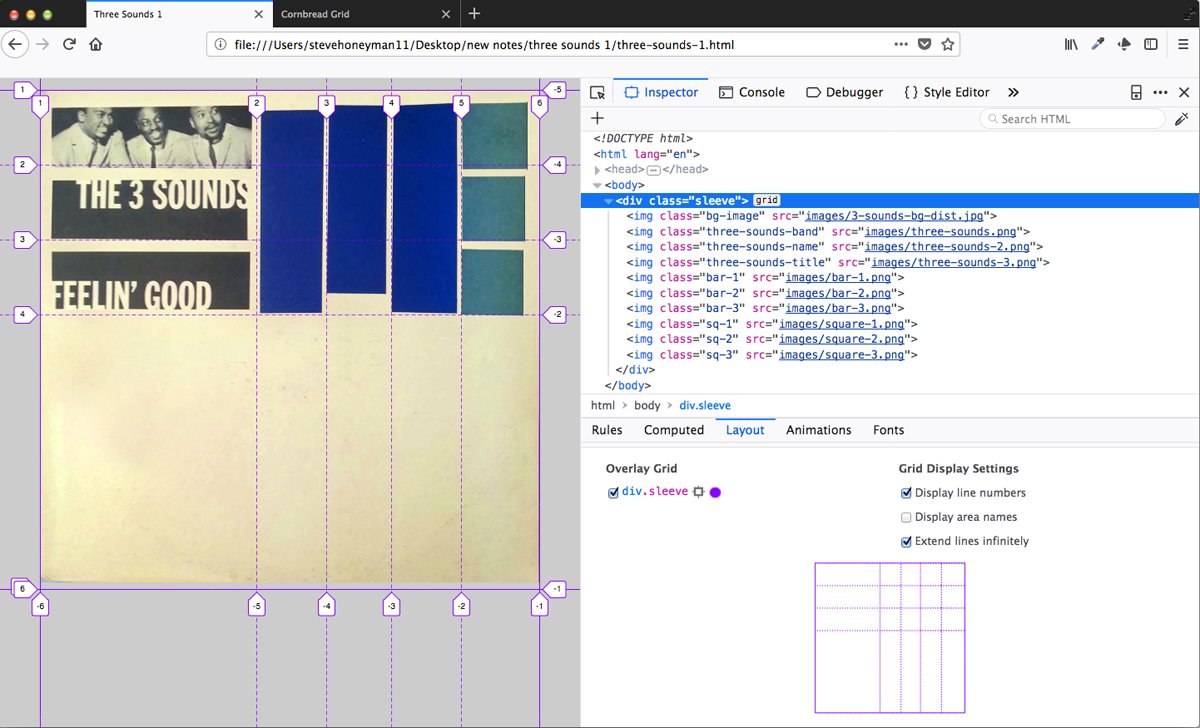
Working on an early version of the Three Sounds sleeve Feelin Good’.
Here’s how Grid enabled me to address the problems I identified above.
Source order and re-ordering layout
One of the things that excites me most about Grid is that we can separate source order from appearance easily and legitimately. We can create structural, semantic mark-up that presents information exactly as the document hierarchy requires and then re-order it on the page without having to use absolute positioning or layout hacks. We simply tell the browser which spaces we’d like elements or content to occupy.
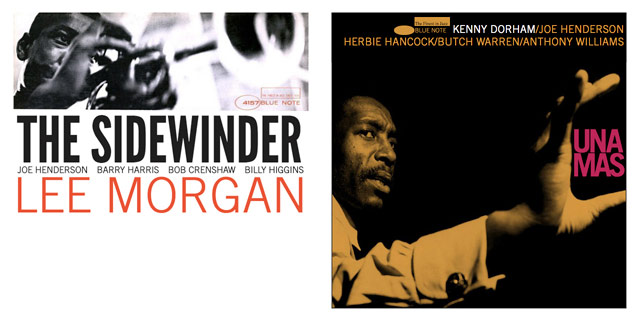
Re-ordering layout whilst maintaining source order was one of the main challenges of this project. I used Flexbox and flex-order on The Sidewinder sleeve and got great results with this, however I switched to CSS Grid to style new sleeves including Una Mas.
Una Mas is a great example of this. Using a mixture of colour, text sizing and placement Reid Miles design deliberately guides our eye. As we look at the sleeve we instinctively read the titling in a specific order; Una Mas > Kenny Dorham > Joe Henderson / Herbie Hancock / Butch Warren / Anthony Williams and then perhaps the Blue Note logo.
On the pre-grid version of Una Mas I had to use absolute positioning to place the <h1> and <footer> elements (Una Mas and the Blue Note logo) on the page, however using grid I was able to place these elements without using absolute positioning.
Here’s the HTML for this later version of Una Mas, it marks-up the page in a way that reflects the hierarchy of information I want to present to the browser and screen readers;
<main class="sleeve">
    <img src="images/una-mas.jpg" alt="Duotone image of Kenny Dorham holding the word Una Mas">

    <h1>Una<br />Mas</h1>

    <section>
	  <h2>Kenny Dorham</h2>
      <ul>
		  <li>/Joe Henderson</li><br />
		  <li>/Herbie Hancock</li>
		  <li>/Butch Warren</li>
		  <li>/Anthony Williams</li>
	  </ul>
    </section>

    <footer class="logo group">
        <span class="rectangle"></span>
	    <span class="elipse"></span>
	    <span class="label">Blue Note</span>
    </footer>
</main>
Here’s the grid the layout was built on;
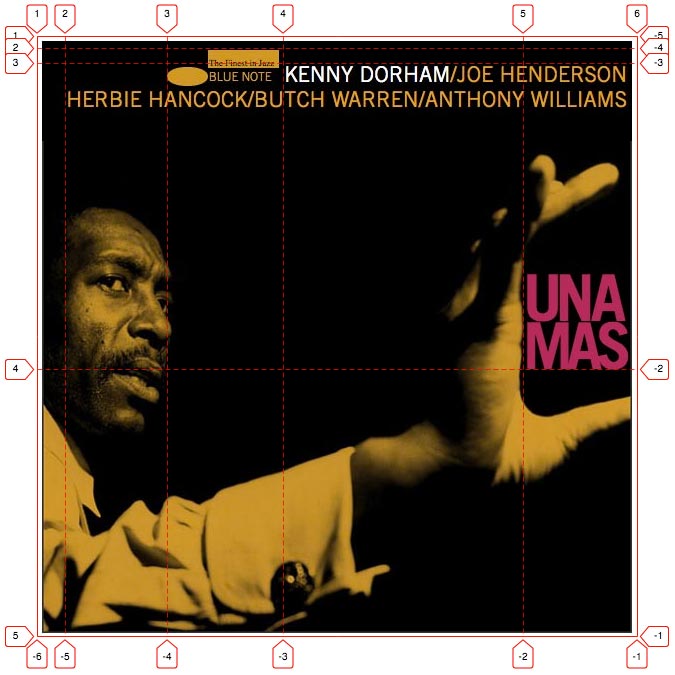
And here’s the CSS for the typographic elements;
h1 {
	grid-column: 5 / 6;
	grid-row: 3 / 4;
}

section {
	grid-column: 2 / 6;
    grid-row: 2 / 4;
}

footer {
    grid-column: 3 / 4;
    grid-row: 2 / 4;
}
Background images
As mentioned earlier I was never happy with such fundamental elements being removed from my HTML. Whilst I could apply an <aria-label> to a containing element this didn’t seem right; being able to place images in my mark-up and apply alt attributes was what I wanted.
Once again Grid made this easy. A quick look at the mark-up for Una Mas and we can see the image is one of the first elements in the source order, has an alt tag and is visible to screenreaders.
Avoiding the padding-bottom hack
Hub-tones was another of those sleeves that looked great but needed a series of hacks to make it work.
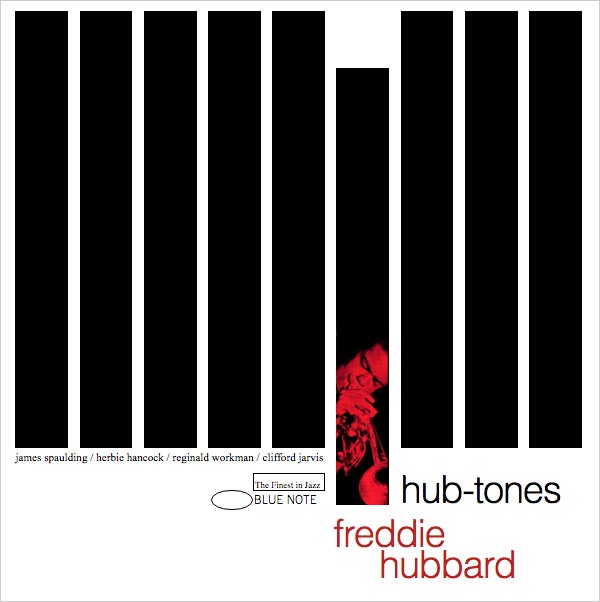
As with all the sleeves I used the padding-bottom hack to re-size the sleeve whilst maintaining the layout whatever the viewport width. The only way I could make the vertical bars resize was to apply the hack to these elements too.
Here’s the SCSS I used to re-create the bars, it incorporates floated content, the padding-bottom hack and absolute positioning, it took a fair bit of time to figure out too!
.layout {
	padding: 1.6666% 2.5% 0;

	.vert-bar {
		width: 9.3%;
		margin-right: 2.0%;
		margin-bottom: 5%;
		height: 0;
		padding-bottom: 77%;
		background-color: #000;
		float: left;
	}

	.vert-bar:nth-of-type(6) {
		position: relative;
		height: 72.0001%;
	   	margin-top: 10%;

	   	img {
	   		position: absolute;
	   		bottom: 0;
	   		max-width: 100%
	   	}
       }

	.vert-bar:last-of-type {
		margin-right: 0px;
	}
}
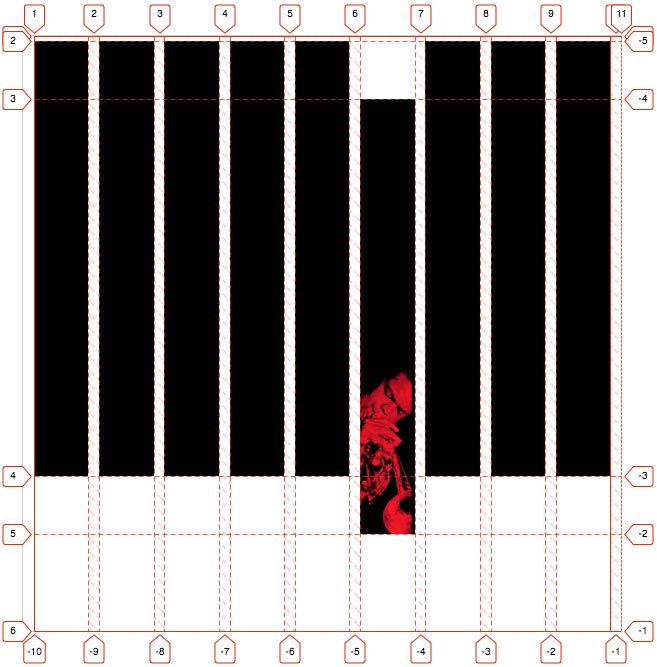
Here’s the CSS I used to define my columns and incorporate the bars using Grid!
.container{
		grid-template-columns: repeat(9, 1fr);
        grid-template-rows: 0.8rem 9.6rem 62.8rem 9.6rem 16.1rem;
		grid-column-gap: 1.833%;
}
And finally a screengrab of the grid defining the vertical bars. I found Firefox’s tools to be invaluable whilst working on this remixed batch of sleeves, being able to put my grid together live in the inspector was brilliant. The same can be said for using Firefox’s clipping path tools live in the browser too.
CSS filters and worn effects
Making the sleeves look worn and aged was something I was keen to incorporate into the project as time progressed and I love the fact that we can do this in the browser now.
On Feelin’ The Spirit I used a mixture of background images, pseudo selectors, blend modes and CSS filters to create the worn effects. Here’s a screengrab of the sleeve with the aged effects applied.
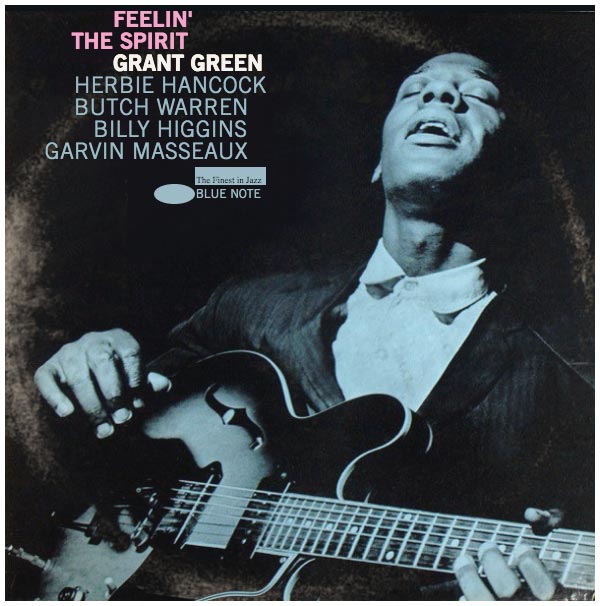
Whilst this sleeve uses some of the older techniques I was keen to discard (background images and the padding-bottom hack), I’m still quite proud of this as I feel I’d pretty much got the mark-up, styling and responsive elements dialled-in by this point.
Once again I was left a little blown away by how powerfully adaptable the HTML and CSS specs are (and have been for a long time) and that with a little bit of a thought how we can create lean, semantic, performant and great looking content for the web.
Here’s the HTML for the sleeve;
<div class="wrapper">
	<div class="container filter">
		<h1>
			<span class="feelin">Feelin'</span><br />
			<span class="spirit">The Spirit</span>
		</h1>
		<h2>Grant Green</h2>

		<ul class="band">
			<li>Herbie Hancock</li>
			<li>Butch Warren</li>
			<li>Billy Higgins</li>
			<li>Garvin Masseaux</li>
		</ul>

		<footer class="logo">
			<span class="rectangle"></span>
			<span class="elipse"></span>
			<span class="label">Blue Note</span>
		</footer>
	</div><!-- closes container div -->
</div><!-- closes wrapper div -->
Here are the styles that matter. The .wrapper and .container classes create the fluid sleeve, the :after pseudo-selector overlays and blends the worn sleeve effect, the .filter class adds the aged effect.
/* --------------- layout --------------*/

.wrapper {
		width: 100%;
	  	max-width: 600px;
	  	border: 5px solid #fff;
	  	margin: 1rem auto 0;
	  	background-color: #0e1318;
	  }

.container{
		position: relative;
		height: 0;
	  	padding-bottom: 100%;
	 	background-image: url('images/feelin-the-spirit.jpg');
	  	background-repeat: no-repeat;
	  	background-size: cover
}

.container:after {
		content: '';
		position: absolute;
		top: 0;
		width: 100%;
		height: 100%;
		background-image: url('images/worn-sleeve.jpg');
	  	background-repeat: no-repeat;
	  	background-size: cover;
	  	mix-blend-mode: lighten;
	  	opacity: 0.95;
}

/* ------------------ filters ------------- */

.filter {
  	-webkit-filter: sepia(0.35) contrast(0.9) brightness(1.1) hue-rotate(-10deg) saturate(1.5);
  	filter: sepia(0.35) contrast(0.9) brightness(1.1) hue-rotate(-10deg) saturate(1.5);
	opacity: 0.95;
}

